How to Test a Water Heater Element with a Multimeter
How to test electric water heater elements with a multimeter. Check for burnt-out or grounded elements before calling a plumber.

February 16, 2025
Safety Disclaimer
Water heater maintenance involves working with pressurized systems, scalding hot water, and potentially hazardous electrical or gas connections. Always shut off power (electric heaters) or gas supply (gas heaters) and allow water to cool to a safe temperature before beginning any maintenance. Wear appropriate safety equipment including gloves and eye protection. If you're uncomfortable with any step, contact a licensed plumber.
When an electric water heater stops producing hot water, the heating element is the most common culprit. Elements burn out, develop internal shorts, or get so coated in mineral scale that they cannot transfer heat effectively. Testing them takes about 15 minutes and requires a basic multimeter that can read ohms.
This walkthrough follows the resistance and ground-fault checks in manufacturer service literature (Rheem and A.O. Smith publish the same 10–16 ohm band for a typical 4500-watt, 240-volt screw-in element). It is a research-desk procedure, not a staged shop test. Owner reports and plumber write-ups keep landing on the same split: a $10–$20 element is far more common than a failed tank, but only a meter reading tells you which one you have.
How electric water heaters work
Most residential electric water heaters have two heating elements: an upper element and a lower element. They don’t run at the same time. The upper element heats the top of the tank first, then the upper thermostat switches off and the lower thermostat activates the lower element to heat the rest of the tank.
This sequential design is why element failure produces different symptoms depending on which one dies:
- Upper element fails: No hot water at all, because the upper thermostat never reaches its setpoint and never hands off to the lower element.
- Lower element fails: You get some hot water from the top of the tank, but it runs out fast because only the upper third of the tank gets heated.
If both elements are working but you are still running out of hot water, the problem is usually a thermostat setting or sediment buildup. Flushing the tank should be your first step in that case.
The multimeter test vs. the dry-fire guess
There are two ways people end up replacing a heating element. The disciplined way is the one on this page: kill power, pull the wires, and let a meter reading tell you whether the element is open, shorted, or grounded before you spend a dollar or drain a drop. The other way is the dry-fire guess: the water is cold, elements are cheap, so the part gets swapped on a hunch, the refill gets rushed, and the breaker goes back on.
The guess has two separate failure modes, and both cost more than a meter reading:
You replace a part that was not bad. Cold water on an electric tank has several possible causes — a tripped high-limit switch, a failed thermostat, a loose wire — and the element is only one of them. Without a meter reading, you have no way to know whether the part you removed was the fault. Owner troubleshooting threads describe this loop over and over: element swapped, tank refilled, still no hot water, thermostat replaced next. The continuity and ground-fault tests below take minutes, need no drain, and are done in place at the terminals, so there is no reason to order parts on a symptom alone.
You dry-fire the new element. An element is a resistor that depends on surrounding water to carry heat away from it. Manufacturer install instructions are blunt about sequence: fill the tank completely, open a nearby hot tap until water runs steady to purge the air, and only then restore power. An element energized in air or in a half-full tank can burn out in moments — sometimes the same day it was installed. A dry-fired element usually reads open on a meter, which is exactly how the failure gets diagnosed after the fact. A repair that skipped the meter often skips the air purge too, and the new part dies for reasons unrelated to whatever made the water cold in the first place.
The order of operations on this page exists to prevent both: test in place first (no drain needed), replace only on a confirmed open, short, or ground-fault reading, and restore power dead last, after a full tank and a purged air pocket. How to drain an electric hot water heater covers the full drain-and-refill sequence for electric tanks.
Tools you need
- Digital multimeter. You need a resistance (ohms / Ω) range, not a $8 plug-in outlet tester and not a clamp meter that only reads amps. A compact digital multimeter with a continuity beep and a manual or auto ohms range is enough. Confirm the dial has an Ω setting before you buy. Typical street price is $15 to $30.
- Flathead and Phillips screwdrivers. For the access panels and the element terminal screws.
- Non-contact voltage tester. A pen-style tester that lights or beeps near live 240-volt leads. Do not skip this. Breaker labels are wrong often enough that you must verify at the tank.
Listing check (element / meter): confirm the meter has a resistance (ohms) range and the replacement element is the same screw-in vs flange style and the same stamped wattage and voltage as the one in the tank. Search pages mix 120-volt RV elements and 240-volt residential parts.
The multimeter and wrench links on this page are Amazon affiliate links; a qualifying purchase may earn this site a commission at no extra cost to you.
Safety first
You are working with 240 volts. That can kill you.
- Go to your electrical panel and turn off the breaker labeled for the water heater. It is typically a 30-amp double-pole breaker.
- Verify at the heater. Remove the upper access panel (two screws on a metal plate on the side of the tank). Fold back the insulation. Hold your non-contact voltage tester near the wire connections to the thermostat. No beep, no light = safe to proceed.
- Do not rely on the breaker label alone. Panels get mislabeled. Always test.
Step-by-step: testing with a multimeter
Step 1: Access the elements
Each element has its own access panel on the front of the tank. Remove the screws, pull off the panel, and fold the insulation back. You will see the thermostat with wires running to two screws on the element below it.
Step 2: Disconnect the wires
Each element has two wires connected to two terminal screws. Use a screwdriver to loosen the screws and gently pull the wires off. This is necessary because testing an element while it is still connected to the thermostat circuit can give a false reading.
Take a photo before disconnecting so you remember which wire goes where. It matters less on elements (either terminal works), but it is a good habit.
Step 3: Test for continuity (is the element burnt out?)
Set your multimeter to the lowest ohms range (usually marked Ω or with a horseshoe symbol). Some digital meters have an auto-range function that handles this for you.
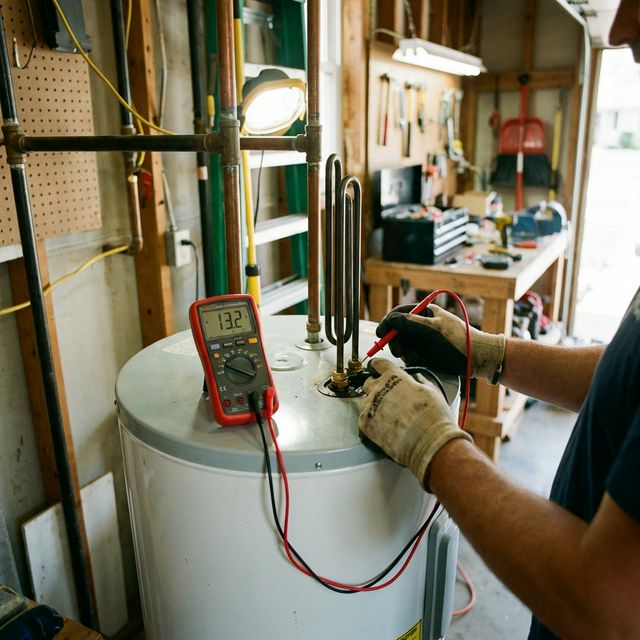
Touch one probe to each element terminal screw. You are measuring the resistance through the heating coil inside the element.
Reading the results:
| Multimeter reading | What it means |
|---|---|
| 10-16 ohms | Element is good (4500W element on 240V) |
| OL, infinity, or no reading | Element is open (burnt out). Needs replacing. |
| 0 ohms | Element has a dead short. Needs replacing. |
The expected resistance depends on the element wattage. For common residential elements:
- 4500W at 240V = about 12.8 ohms
- 3500W at 240V = about 16.5 ohms
- 5500W at 240V = about 10.5 ohms
The formula is R = V² / W, but you don’t really need to calculate it. If your meter shows a reading in the 10-20 ohm range, the element is probably fine. If it shows OL (open loop) or zero, it’s bad.
Step 4: Test for a grounded element
This is the test most people skip, and it catches a problem that the continuity test misses. A grounded element has a crack in its insulation that allows current to leak to the tank body. The element might still heat water, but it draws more power than it should, can trip the reset button repeatedly, and could create a shock hazard.
Keep your multimeter on the ohms setting. Touch one probe to either element terminal screw. Touch the other probe to the bare metal body of the element (the exposed metal flange or the tank itself near the element).
Reading the results:
| Multimeter reading | What it means |
|---|---|
| OL or infinity | No ground fault, element insulation is intact |
| Any numerical reading | Element is grounded. Needs replacing. |
If you get any reading at all, even a high one like 100,000 ohms, the element has a ground fault and should be replaced.
Step 5: Test the other element
Repeat Steps 2 through 4 on the other element. While you are in there, check both thermostats by pressing the red reset button on each one. If it clicks when you press it, the thermostat had tripped, which could indicate a problem with the element it controls.
Replacing a bad element
If the meter shows an open, shorted, or grounded element, replacement is a DIY-friendly job. You will need to drain the water heater first, since the elements thread into the tank below the waterline. Electric tanks have extra breaker and dry-fire risks; use how to drain an electric hot water heater if that is the unit in front of you.
What you need:
- Replacement element that matches the stamped wattage, voltage, and mounting style (screw-in 1-inch NPSM is the usual residential fit; some older tanks use a four-bolt flange)
- An element wrench — a thin-wall socket sized for the element hex, not a standard 1-1/2 inch deep socket that will not clear the tank jacket
- PTFE thread seal tape for screw-in threads
- A bucket and towels
Listing check (element wrench): confirm the wrench is sold for water-heater elements (thin-wall, typically 1-1/2 inch) and not a generic oil-filter cup. The listing title should say water heater element.
Refill and restore power last
The final step of the swap is where new elements die. Fill the tank fully before the breaker goes back on:
- Close the drain valve and open the cold-water inlet valve.
- Open a hot-water tap elsewhere in the house and let it run until the flow is steady with no spitting — that is the air pocket purging.
- Only then re-energize the breaker. An element powered before the tank is full and purged can dry-fire and burn out in moments, and the meter reading that justified the repair becomes the reading that diagnoses the brand-new part.
The whole job takes about an hour, including drain and refill. Elements run $8 to $20. A plumber for this swap typically bills $150 to $250 in labor — water heater repair: DIY fixes vs. when to call a plumber walks that decision. If both elements test good, move to the thermostat and sediment checks below instead of replacing parts on a guess. After you refill, if the tank still will not heat, see hot water heater not working and no hot water after flushing.
When the element is not the problem
If both elements test good, the problem is elsewhere:
-
Thermostat failure: Test the thermostats with your multimeter. Set the meter to continuity or ohms. With power off and wires disconnected, the thermostat should show continuity (near 0 ohms) between the input and element terminals when the dial is set above room temperature. If it shows OL, the thermostat is bad. Replacement thermostats cost $8 to $15. If the thermostat passes but water temperature is simply off, the water heater thermostat adjustment guide covers settings before you buy parts.
-
Tripped high-limit reset: The red button on the upper thermostat is a safety cutoff. If it keeps tripping, either the thermostat is set too high, the element is grounded, or the thermostat itself is faulty.
-
Sediment insulating the lower element: Heavy sediment accumulation on the lower element reduces heat transfer and causes the lower thermostat to run continuously. Flushing the tank may solve this without any parts replacement.
-
Undersized tank: If the tank is simply too small for your household demand, no amount of element testing will fix the issue. A 40-gallon tank supports about two showers back-to-back. Three or four people showering in succession need a 50- or 80-gallon unit.
Frequently asked questions
What should a good water heater element read on a multimeter?
A functioning 4500-watt element on a 240-volt circuit should read between 10 and 16 ohms, the band Rheem and A.O. Smith publish in their service literature. A reading of zero or infinity means the element is bad and needs replacing.
Can I test a water heater element without removing it?
Yes. You can test the element in place by disconnecting the two wires from the element terminals and placing your multimeter probes on the terminals. The tank does not need to be drained for this test — which is exactly why the meter check should come before any parts order or phone call to a plumber.
How do I know if my upper or lower element is bad?
If you have no hot water at all, the upper element or upper thermostat has likely failed. If you get some hot water but it runs out quickly, the lower element is probably the problem. The symptom narrows the suspect list; the meter confirms it in a few minutes.
How long do water heater elements last?
Typical lifespan is 6 to 10 years, depending on water quality. Hard water with high mineral content shortens element life because scale builds up on the element surface and causes it to overheat — how hard water destroys your water heater covers the mechanism and the fixes.
Can a bad element cause high electric bills?
It can. A grounded element can draw power continuously, even when the thermostat is not calling for heat, and that constant draw shows up on your electric bill. The same fault can trip the reset button repeatedly and presents a shock hazard, which is why the ground-fault test in Step 4 matters as much as the continuity test. If the meter shows any reading between a terminal and the tank, replace the element rather than waiting for the bill to confirm it.
Related guides
- How to Drain a Hot Water Heater, Required before element replacement
- How to Drain an Electric Hot Water Heater, Extra breaker and dry-fire steps
- Hot Water Heater Not Working, If both elements test good
- Water Heater Repair: DIY Fixes vs. When to Call a Plumber, Keep-or-swap decision costs
- Gas vs. Electric Maintenance Differences, Full comparison of maintenance needs
- Water Heater Safety: 7 Hazards Every Homeowner Should Know, Electrical safety protocol
- When to Replace Your Anode Rod, Another common wear part
- How Hard Water Destroys Your Water Heater, Why elements scale up and fail early
Sources
- Rheem, Electric Water Heater Troubleshooting, Manufacturer element testing guidelines
- A.O. Smith, Homeowner’s Guide to Electric Water Heater Maintenance, Element resistance specifications
- U.S. Department of Energy, Water Heating, Water heating energy use background
Editorial Team
Nobody should pay a plumber $300 to turn a drain valve. Our guides are built from manufacturer documentation, plumbing code references, and the documented experience of homeowners and plumbers.