How to Insulate a Water Heater to Save Energy
A blanket is half the job: match the tank wrap to your factory R-value, sleeve the pipes, and skip the myth of 45 percent savings.

May 26, 2026
Safety Disclaimer
Water heater maintenance involves working with pressurized systems, scalding hot water, and potentially hazardous electrical or gas connections. Always shut off power (electric heaters) or gas supply (gas heaters) and allow water to cool to a safe temperature before beginning any maintenance. Wear appropriate safety equipment including gloves and eye protection. If you're uncomfortable with any step, contact a licensed plumber.
Insulating a water heater is two jobs sold as one. The famous half is the foil blanket that wraps the tank. The forgotten half is the foam sleeve that goes on the first stretch of pipe — and in plenty of homes the pipe half pays back faster than the blanket. Which half comes first depends on the R-value your tank already carries on its rating plate.
A blanket wraps the tank so heat stays in the water instead of warming a garage nobody is trying to heat. It is a cheap wrap, not a new heater and not a substitute for a working anode or a flush. The touch-test and the gas-clearance check come before the blanket SKU. Setpoint is a different lever entirely: water heater thermostat adjustment. How long a tank is worth wrapping is how long water heaters last.
Desk note: Standby-loss language below follows Energy.gov / Energy Saver water-heater insulation guidance plus manufacturer spec sheets for the products named. This desk did not run a calorimeter on your garage tank — there is no hands-on testing here, only synthesized public guidance, manufacturer specs, and owner-review consensus. Older, warm-to-the-touch tanks in unheated rooms are the usual win. A cool 2015+ jacket in a conditioned closet is a small leftover, not a 25–45 percent energy story.
The Blanket-Only Myth
The myth: “insulate the water heater” means buying one blanket, any tank, and watching a headline percent come off the bill. Retail copy encourages it — “cut heat loss up to 45 percent” shows up on listings that never mention what the tank already has. The real job is a short R-value ledger, and the blanket is only one line in it.
- The factory foam does most of the insulating. A 2015+ tank ships with roughly R-12 to R-16 of foam bonded to the shell before you ever open a kit. A blanket adds R-6.7 to R-10 — which matters a lot on a thin jacket and very little on a thick one.
- The blanket targets old, thin, cold-room tanks. Pre-2005 tanks around R-6 to R-8, and any tank spending winter in an unheated garage, are where the wrap earns its $20 to $35.
- Pipes have no factory insulation at all. Bare copper radiates along every exposed run. A foam sleeve is the only R-value that pipe will ever get, and it is the cheaper of the two SKUs.
- Nobody measured your bill. Energy.gov treats a blanket as a standby-loss cut on older, thinly insulated tanks, not a guaranteed percent on every bill. Any percent claim that is not tied to your tank’s R-value, the room temperature, and the fuel is marketing copy.
Before You Buy a Blanket
Do this in order. Buying the kit first is how people tape foil over a draft hood or wrap a heat-pump tank that needs room air.
- Touch the shell. Place a hand on the side of the tank (not the flue, not the T&P). Warm means heat is leaving. Cool or room-temperature usually means the factory foam is already doing the job.
- Read the energy label and the rating plate. Copy fuel, gallons, and any printed R-value. Pre-2005 tanks are often R-6 to R-8. Many 2015+ tanks are R-12 to R-16. Energy.gov still talks about adding insulation when factory foam is thin; it does not publish a desk-measured percent for every jacket.
- Confirm the fuel path. Gas: flue, draft hood, combustion-air opening, and gas valve must stay uncovered. Electric: access panels and the junction box must stay reachable. Heat-pump / hybrid tanks are a skip — they pull heat from room air.
- Measure height and circumference. Most kits are a one-size sheet you trim. A 75-gallon or a squat 50 can need a different cut than a tall 40.
- Then open a listing. A Frost King water heater insulation blanket is the tank wrap this site already points at: foil or vinyl face, sold for tanks up to about 60 gallons, typically cited as about R-10. Pipe sleeves are a separate SKU. Foam pipe sleeves in 3/4-inch are the usual residential hot-outlet size.
Listing check (tank blanket vs pipe wrap): confirm a water-heater tank blanket (foil or vinyl face, a stated tank-gallon range, R-6 to R-10) — attic batts, pipe-wrap rolls, and heat-tape cables share the same “heater insulation” search results.
Disclosure: the Amazon links above carry this site’s affiliate tag, and we may earn a commission on qualifying purchases at no added cost to you.
Flush interval if the tank already pops: how often should you flush a water heater. A tankless unit has no jacket to wrap — that is tankless pros and cons.
Does Your Water Heater Need Insulation?
Not every tank benefits equally.
The Touch Test
If the outer shell feels warm, a blanket can cut standby loss. If it feels cool, the leftover is small. Trust the hand, not a marketing “up to 45 percent.”
Check the R-Value
| Built-in R-Value | Blanket Benefit |
|---|---|
| R-6 to R-8 (older units, pre-2005) | High — usual candidate |
| R-8 to R-12 (2005-2015 units) | Moderate — useful in a cold garage |
| R-12 to R-16 (2015+ units) | Low — optional |
| R-16+ (some premium models) | Minimal — usually skip |
Energy.gov discusses adding insulation when factory foam is thin. Almost no residential tank ships at the high R numbers used for whole-house envelopes. That is why older tanks still show up on this page. It is not a promise that every 2020 tank needs a wrap.
Location Matters
A tank in an unheated garage loses more heat than one in a conditioned utility room. The wrap is most useful when:
- The heater sits in an unheated garage, basement, or crawl space
- The room regularly drops below about 60°F
- Air moves across the tank (a drafty garage door)
The R-Value Listing, Layer by Layer
Put every layer on one page and the blanket stops looking like the whole story:
| Layer | Typical R-value | Where it lives |
|---|---|---|
| Factory foam, pre-2005 tank | R-6 to R-8 | Under the steel shell |
| Factory foam, 2005-2015 tank | R-8 to R-12 | Under the steel shell |
| Factory foam, 2015+ tank | R-12 to R-16 | Under the steel shell |
| Add-on blanket kit | R-6.7 to R-10 | Wraps the shell |
| Foam pipe sleeve, 3/8-inch wall | about R-3 | Hot outlet and cold inlet |
| Foam pipe sleeve, 1/2-inch wall | about R-4 | Hot outlet and cold inlet |
Treat those as manufacturer-cited and guideline ranges, not lab figures. Two rules govern all of them: a compressed blanket loses R-value, and R-numbers only pay where there is a temperature difference to fight — a tank in a warm closet has almost none.
The pipe row is the one people skip. DOE’s Savings Project on insulating water pipes frames the payoff without a percent: insulated hot pipes deliver water roughly 2°F to 4°F hotter than bare pipe can, hot water arrives at the tap faster so less water runs down the drain while you wait, and the extra margin lets you trim the tank setpoint a notch. That is a comfort-and-waiting win the blanket cannot give you, because the blanket does not touch the pipe run at all.
What You Will Need
| Item | Purpose | Research range |
|---|---|---|
| Insulation blanket kit (R-6.7 to R-10) | Wraps the tank | $20–$35 |
| Utility knife or scissors | Trims openings | Already owned |
| Measuring tape | Height and circumference | Already owned |
| Foil tape or the kit straps | Holds the seam | $5–$8 |
| Marker | Marks cutouts | Already owned |
| Pipe insulation sleeves | First 3–5 feet of pipe | $3–$10 |
Treat those dollar bands as street-price research, not a quote.
Safety Rules Before You Start
Covering the wrong opening is the failure mode. Follow the fuel you copied.
For gas water heaters:
- Never cover the top of the tank. The flue and draft hood stay fully exposed.
- Do not cover the gas control valve or thermostat at the bottom.
- Keep insulation at least 2 inches away from the combustion-air opening at the base.
- Do not block the T&P relief valve or its discharge pipe.
- Do not cover the burner access panel.
For electric water heaters:
- Do not cover the thermostat access panels.
- Keep insulation away from the T&P valve and discharge pipe.
- You can cover the top of an electric tank (no flue), but leave the electrical junction box clear.
Both types:
- Do not use a facing that can melt against a flue or a burner.
- Do not compress the blanket. Compressed insulation loses R-value.
Step-by-Step Installation
Step 1: Measure Your Tank
Most standard residential tanks are 48 to 60 inches tall and 56 to 70 inches in circumference (18 to 22 inches in diameter). Kits are usually a sheet you trim. Unusually large (75+ gallon) tanks may need a larger sheet.
Step 2: Stand the Blanket Against the Tank
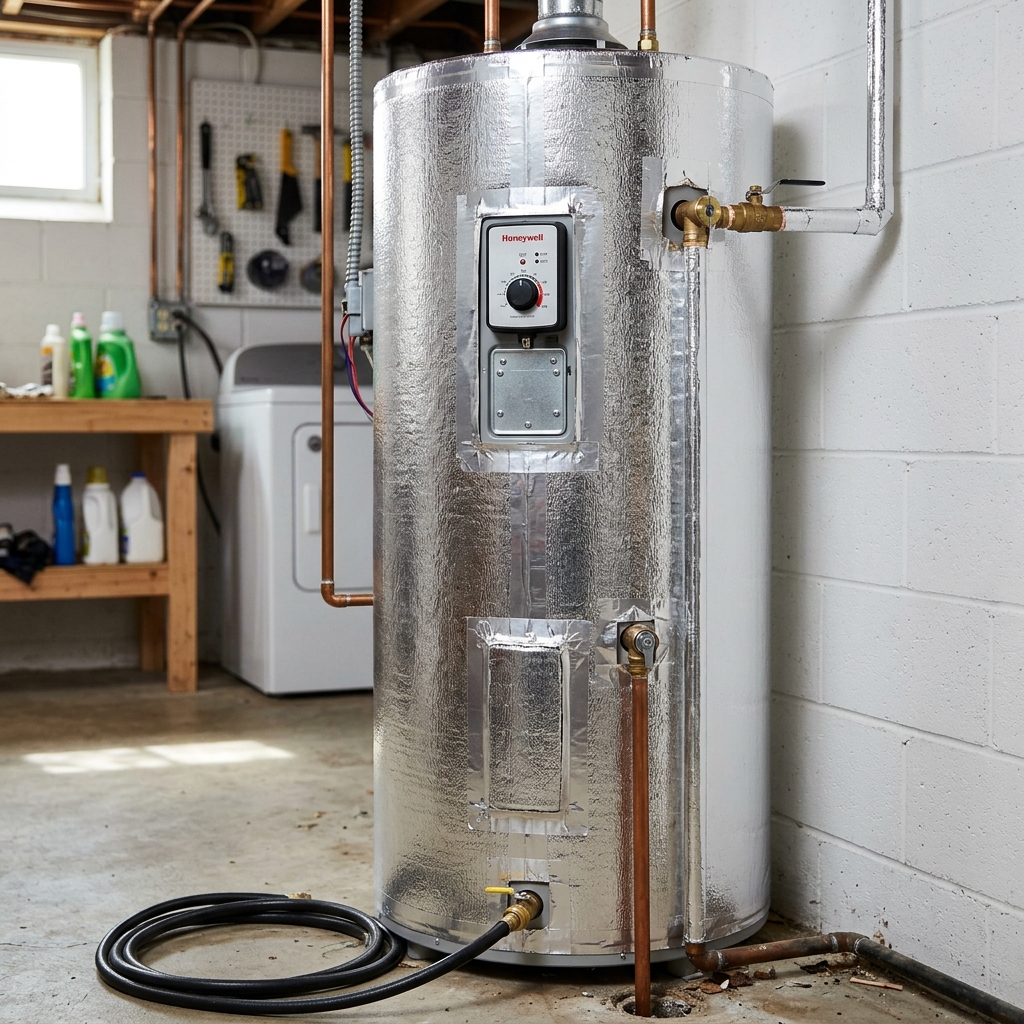
Unroll the blanket and wrap it around the tank. The foil or vinyl side faces outward. The top edge sits at or slightly below the top of the tank.
Gas: Bottom edge at least 2 inches above the gas control and burner. The wrap does not go to the floor.
Electric: You can extend the blanket to within an inch of the bottom and include the top.
Step 3: Mark and Cut Openings
With the blanket held against the tank, mark:
- T&P relief valve and discharge pipe
- Thermostat access panels (electric)
- Pipe connections at the top
- Gas control and pilot area (gas)
- Electrical junction box (electric)
- The data plate and the lighting-instruction label
Cut the holes 1 to 2 inches larger than the part so nothing is taped over a safety opening.
Step 4: Secure the Blanket
Wrap and secure with the kit straps or foil tape.
- Tape the vertical seam
- Tape the top and bottom edges so the sheet cannot slide over a burner or a panel
- Do not tape over cutouts
Step 5: Insulate the Pipes
Insulate the first 3 to 5 feet of the hot outlet and the cold inlet. Slip the foam sleeves on and tape the joints. The hot sleeve slows pipe loss. The cold sleeve near the heater cuts condensation and slows heat walking backward up the cold pipe. Details in the next section, because this half of the job deserves its own plan.
Step 6: Check Your Work
- Let the heater run a full cycle.
- Confirm the blanket has not sagged over the combustion area (gas) or the access panels (electric).
- Confirm the T&P lever is reachable and the discharge pipe is open.
- Feel the outside of the blanket. It should be cooler than the bare tank was.
The Pipe Half of the Job
The blanket myth keeps the focus on the tank, but the pipes are bare copper from day one. Three things make the pipe half worth its own trip to the store:
- It is cheap and fast. Foam sleeves run about $1 to $3 per 6-foot section and snap on in minutes with no tools beyond a knife for odd lengths.
- It pays at the fixture, not just the tank. Shorter wait for hot water means less water wasted down the drain, and the extra 2°F to 4°F of delivery temperature DOE describes is margin you can trade for a lower setpoint.
- It works in both directions. The cold inlet sleeve cuts tank “sweat” in humid basements and slows heat creeping backward up the cold line between draws.
Measure the pipe before you buy — 3/4-inch and 1/2-inch are the common residential sizes, and a loose sleeve is a convection channel rather than insulation. Slit sleeves butt together end to end; cover the seams and any elbow joints with tape so air cannot crawl inside. Run the sleeves at least the first 3 to 5 feet from the tank, and keep going on any exposed run through cold space where it is easy to reach.
One limit worth stating plainly: a foam sleeve slows heat loss, but it is not heat tape and it will not save a pipe that actually freezes hard. For a cabin, an unheated garage, or a shutdown-period plan, the right page is how to winterize a water heater. And both halves of the insulation job ride on top of a maintenance rhythm, not instead of one — water heater maintenance schedule.
Other Levers (Not a Combined Percent)
These stack with a blanket. They do not add up to a guaranteed 25–40 percent on a bill.
- Lower the thermostat and measure the tap. Energy.gov discusses about 3–5 percent water-heating energy per 10°F you drop the setpoint. That is published guidance, not a utility quote. Walk water heater thermostat adjustment.
- Flush sediment. A hard crust makes the burner or element work longer. Schedule: how often to flush. Method: how to flush a water heater.
- Heat traps. Most tanks installed after 2000 already have them on the nipples. Adding them is a retrofit, not a blanket job.
- Electric timer. A timer can drop overnight standby on a resistance-electric tank with a predictable schedule. It is not a gas job and not a heat-pump job.
Skip the Blanket
- The shell is already cool and the tank sits in a heated room
- Factory foam is R-16 or higher
- The unit is a heat-pump / hybrid tank (the wrap starves the evaporator of room air)
- The unit is tankless — there is no storage jacket
- You would have to cover a gas draft hood, a burner opening, or a T&P to make the kit “fit”
- The tank is already leaking at the steel shell — wrap is not a repair; see how long water heaters last
Frequently Asked Questions
How much money does insulating a water heater save?
Energy.gov treats a blanket as a standby-loss cut on older, thinly insulated tanks, not a guaranteed percent on every bill. Research-range illustrations for an older tank in an unheated space often land around a few tens of dollars a year. A typical blanket is $20 to $35. Newer 2015+ tanks with thick factory foam already do most of that job.
Can you put an insulation blanket on a gas water heater?
Yes, but you must keep insulation away from the top of the tank, the gas control valve at the bottom, the combustion air intake, and the flue at the top. Never cover the T&P valve or its discharge pipe. Most insulation blanket kits include instructions specific to gas models.
Do new water heaters need insulation blankets?
Most water heaters manufactured after 2015 have R-12 to R-16 built-in insulation, which meets current energy standards. Adding a blanket to these units provides a smaller benefit. Touch the side of the tank. If it feels warm, the built-in insulation is not fully blocking heat loss and a blanket will help.
Can insulating a water heater cause overheating?
Not if done properly. The blanket reduces heat loss from the outside of the tank but does not change the thermostat or heating cycle. Keep insulation away from the thermostat access panels, T&P valve, and any venting components. The tank’s built-in safety systems continue to function normally.
Should I insulate the hot water pipes too?
Yes. Insulating the first 3 to 5 feet of hot and cold water pipes connected to the water heater reduces heat loss in the pipes and delivers hotter water to distant fixtures faster. Pipe insulation sleeves cost $1 to $3 per 6-foot section and take minutes to install. See the pipe section above — on many homes this half of the job is the better buy.
Related Guides
- Water Heater Thermostat Adjustment
- How Often Should You Flush a Water Heater?
- How Long Do Water Heaters Last?
- Tankless Water Heater Pros and Cons
- Water Heater Temperature Settings
- How to Flush a Water Heater
- Annual Water Heater Maintenance Checklist
- Gas vs. Electric Maintenance
- How to Winterize a Water Heater
- Water Heater Maintenance Schedule Checklist
Sources
- U.S. Department of Energy, Water Heater Insulation — standby-loss and add-insulation guidance for thinly insulated tanks
- U.S. Department of Energy, Savings Project: Insulate Your Water Pipes — pipe-sleeve payoff (hotter delivery, less wait) and step-by-step approach
- ENERGY STAR, Water Heaters — context on current tank efficiency standards and factory insulation levels
Editorial Team
Nobody should pay a plumber $300 to turn a drain valve. Our guides are built from manufacturer documentation, plumbing code references, and the documented experience of homeowners and plumbers.