Water Heater T&P Relief Valve: Testing and Replacement Guide
The T&P valve is your water heater's most important safety device. Learn how to test it and when to replace it.
Safety Disclaimer
Water heater maintenance involves working with pressurized systems, scalding hot water, and potentially hazardous electrical or gas connections. Always shut off power (electric heaters) or gas supply (gas heaters) and allow water to cool to a safe temperature before beginning any maintenance. Wear appropriate safety equipment including gloves and eye protection. If you're uncomfortable with any step, contact a licensed plumber.
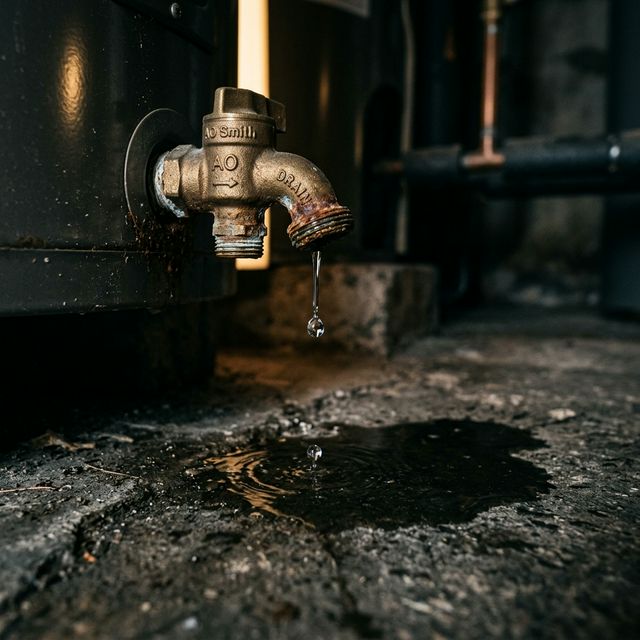
The temperature and pressure relief valve (T&P valve, or TPR valve) is the most important safety device on your water heater. It is also the one that homeowners understand least and maintain almost never.
This valve has one job: if the pressure inside the tank exceeds 150 PSI, or the water temperature exceeds 210 degrees F, the valve opens and releases water through a discharge pipe. That controlled release prevents an uncontrolled release, which in the worst case means a ruptured tank.
Every water heater has one. Every homeowner should know how to test it, when to replace it, and why it should never be plugged, capped, or ignored.
How the T&P Valve Works
The T&P valve is mounted on the side of the tank (sometimes on the top, depending on the model) and connects to a discharge pipe that runs down the side of the heater to within 6 inches of the floor or to an exterior drain.
Inside the valve, a spring-loaded mechanism holds a seal against the valve seat. The spring is calibrated to release at 150 PSI or 210 degrees F, whichever comes first. Under normal operating conditions (120 degrees F, 40-80 PSI), the valve stays closed.
When either threshold is exceeded, the spring compresses and the valve opens, allowing hot water to flow through the discharge pipe until pressure or temperature drops below the danger zone. The valve then reseats and closes.
It is a simple, passive safety device with no electronics, no power supply, and no moving parts other than the spring and seal. That simplicity is what makes it reliable. But springs and seals do wear out, which is why testing and replacement matter.
Why It Matters: The Worst-Case Scenario
The MythBusters famously demonstrated what happens when a water heater’s T&P valve is disabled and the thermostat fails. The tank pressure built until the tank ruptured, launching it through a roof like a rocket. The segment made great television, but the underlying physics is real.
In normal homes, this scenario requires multiple simultaneous failures: the thermostat must stick in the “on” position, the T&P valve must be seized shut or capped, and the tank must hold pressure long enough to reach catastrophic failure. All three are unlikely to happen together, but the T&P valve is the final safety net. If the thermostat fails, the T&P valve prevents a disaster.
That is why you never cap the discharge pipe, never replace the T&P valve with a plug, and never ignore a valve that is not working.
How to Test Your T&P Valve
Testing takes less than two minutes and should be done once a year. Here is the process:
What You Need
- A bucket
- Towels for cleanup
- Work gloves (the water will be hot)
Steps
-
Place a bucket under the discharge pipe. The end of the pipe should be within 6 inches of the floor. If the pipe is routed outside, check the exterior terminus instead.
-
Lift the test lever on the T&P valve. It is a metal lever on top of the valve body. Lift it about 90 degrees and hold it for 2 to 3 seconds.
-
Listen and watch. You should hear water rushing through the valve and see it flow from the discharge pipe into the bucket. The water will be hot.
-
Release the lever. Let it snap back to the closed position. The water flow should stop completely within a few seconds.
Interpreting the Results
| Result | Meaning | Action |
|---|---|---|
| Water flows during test, stops when released | Valve is working correctly | No action needed |
| No water flows when lever is lifted | Valve is seized closed | Replace immediately |
| Water continues dripping after lever is released | Valve seat is worn or debris is preventing full closure | Lift and release the lever a few more times to clear debris. If dripping persists, replace the valve |
| Water is already dripping before you test | Valve is leaking (possibly worn, or system pressure is too high) | Check system pressure first, then replace if needed |
If the valve is seized (no flow during the test), do not force it. A seized T&P valve should be replaced, not pried open. Forcing it can break the valve body or damage the tank threads.
When to Replace the T&P Valve
Replace the valve if:
- It fails the annual test (no flow or continuous dripping)
- It discharges water during normal operation (not during testing)
- It is more than 5 years old and has never been tested (the seal may have degraded)
- You are performing a major service on the water heater and the valve shows signs of corrosion or mineral buildup
- Your plumber recommends it during a maintenance visit
T&P valves are inexpensive ($15 to $25) and widely available. There is no reason to delay replacement when a valve shows signs of wear.
Step-by-Step Replacement
Tools and Materials
| Item | Purpose |
|---|---|
| New T&P relief valve (match the BTU rating and pressure/temperature specs of the old one) | Replacement part |
| Pipe wrench | Removes old valve |
| Teflon tape | Seals threads |
| Bucket and towels | Catches water |
| Garden hose (optional) | For partial tank drain |
A reliable replacement is the Watts 3/4-Inch T&P Relief Valve, which fits most residential water heaters rated up to 150,000 BTU.
Step 1: Turn Off Power and Water
- Electric: Flip the breaker.
- Gas: Turn the gas control to “Off” or “Pilot.”
- Turn off the cold water supply valve.
Step 2: Drain Below the Valve Level
If the T&P valve is mounted on the side of the tank (most common), you need to drain the tank until the water level is below the valve port. Connect a garden hose to the drain valve and drain 5 to 10 gallons.
If the valve is on top of the tank, you can skip this step, though draining a few gallons reduces the amount of water that will pour out when you remove the valve.
Step 3: Remove the Discharge Pipe
Disconnect the discharge pipe from the T&P valve. On most installations, the pipe is threaded or connected with a union fitting. Set it aside; you will reconnect it to the new valve.
Step 4: Remove the Old Valve
Use a pipe wrench to unscrew the old T&P valve from the tank. Turn counterclockwise. The valve threads into a 3/4-inch opening in the tank shell.
Step 5: Inspect the Port
Look inside the valve port on the tank. Clear any debris, old Teflon tape, or mineral deposits from the threads. Wipe the threads clean with a rag.
Step 6: Install the New Valve
Wrap the threads of the new valve with 5 to 6 wraps of Teflon tape. Thread the valve into the port by hand, then tighten with a pipe wrench. The valve lever should point away from the wall so you can access it for annual testing.
Match the specs. The new valve must match or exceed the BTU input rating of your water heater, and it must be rated for 150 PSI and 210 degrees F. These specs are printed on the valve body. Do not install a valve rated for lower pressure or temperature than the original.
Step 7: Reconnect the Discharge Pipe
Thread the discharge pipe back onto the new valve. The pipe must run downward (never upward) to within 6 inches of the floor or to an exterior drain. Use no valves, caps, or restrictions along its length. The pipe diameter must match the valve outlet size (typically 3/4 inch).
Step 8: Restore Service
- Close the drain valve.
- Turn on the cold water supply.
- Open a hot faucet to purge air.
- Once the tank is full and air is cleared, restore power.
- Test the new valve by lifting the lever and verifying water flow.
- Check all connections for leaks.
Why Your T&P Valve Might Be Dripping
If your T&P valve drips during normal operation (not during a test), do not just replace the valve without checking the underlying cause. The dripping may be the valve doing exactly what it is supposed to do.
Check System Pressure
Use a water pressure gauge on a hose bib to measure your incoming water pressure. Normal is 40 to 80 PSI. If it is above 80 PSI, install a pressure-reducing valve on the main line.
Check for Thermal Expansion
If your home has a closed plumbing system (backflow preventer, check valve, or PRV on the main line), thermal expansion from the water heater can push system pressure above the T&P valve’s relief threshold. An expansion tank absorbs this expansion and prevents the valve from cycling.
Check Water Temperature
If the thermostat is set above 140 degrees F, the water may be approaching the valve’s temperature threshold. Lower the thermostat to 120 degrees F.
Discharge Pipe Rules
The discharge pipe is not optional, and it is not a decoration. Follow these rules:
- Material: Copper, CPVC, or galvanized steel. Not PVC (it cannot handle the temperature).
- Direction: Always runs downward. No upward runs, no traps, no horizontal sections that could trap water.
- Termination: Within 6 inches of the floor, a drain, or the exterior. Never into a wall, ceiling, or closed space.
- No restrictions: No valves, caps, plugs, or reducers. The full bore of the pipe must be open at all times.
- Visibility: The end of the pipe should be visible so you can see if the valve is discharging.
Related Guides
- Water Heater Safety Guide, Complete safety overview including T&P valves
- Water Heater Expansion Tank Guide, Solve thermal expansion dripping
- How to Drain a Hot Water Heater, Needed for valve replacement
- Annual Water Heater Maintenance Checklist, Include T&P testing in your routine
- Water Heater Temperature Settings, Prevent temperature-related valve activation
Sources
- ASME/ANSI Z21.22, Relief Valves for Hot Water Supply Systems, Manufacturing and performance standards for T&P valves
- International Residential Code (IRC), Section P2803, Requirements for pressure and temperature relief
- Watts Water Technologies, T&P Valve Guide, Installation specifications and sizing